
The Role of The Upper Back In Your Squat
Big, heavy squats. It's a rush we crave- the many emotions of descending into the hole, doubting whether you'll come back up, and successfully finishing the rep. The primary aspect of a heavy squat that comes to mind is your lower body. While squats are a Powerlifting movement, they’re also a staple in any Fitness Influencer’s program to get a bigger butt. Obviously, the role the quads and glutes play in your squat strength is undeniable. But, a key technical component that’s often overlooked is your upper back. As Powerlifters, we train movements, not muscles- and every single muscle group in your body- is recruited in the Big 3. Approaching your lifts this way will transform your technique- and therefore your potential- as efficiency determines the total weight you can move. You’re not squatting (just) to grow your legs, you’re squatting to grow your total. So, when you’re trying to hold hundreds of pounds on your back, you better believe your upper body will be involved, too. Stability through your back will assist your legs in moving the weight. Loss of tension can be (and often is) why lifters fail a squat PR attempt. If you’re looking to break your current PR, don’t make the mistake of ignoring your upper back- it could be the game-changer you’ve been searching for.
*Here, we will be specifically discussing Low Bar back squats, as that’s the typical Competition-style squat, but the upper back is crucial in High Bar, as well.
What is the upper back?
Before discussing upper back positioning in your squat, let’s briefly describe the muscle groups that make up your upper back, so you can better understand their roles in your movements.
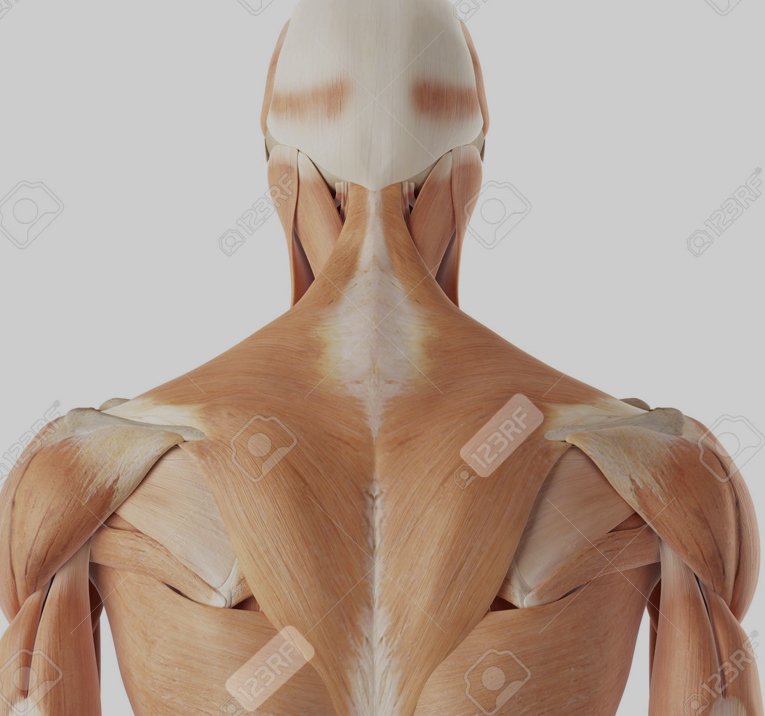
There are other muscle groups in this area, but these are the primary ones to discuss:
A) Trapezius (upper, middle, lower- the traps start from below the neck and run down your back). Functions: Upper region- elevate the scapula (shrugging your shoulders), extend the neck, and upwardly rotate the shoulders. Middle- assists with scapula retraction (squeezing shoulder blades together). Lower- depresses the scapula (pulling your shoulders down) and assists in upward rotation.
B) Latissmus dorsi or “lats” (are located below the shoulder joint, starting around the rhomboid and running down the sides of your back). These muscles function to adduct the arm (pull the arm in toward your midline), extend the shoulder (moving it closer to the body), rotate the shoulder inward, as well as aid in scapular depression (pulling the shoulders down), etc.
C) Rhomboids (major and minor, located toward the center of your upper back, where your shoulder blades lie). These muscles help retract, elevate, and upwardly rotate the scapula, similar to the upper traps.
D) Rear deltoids (backs of your shoulders). Yes, your shoulders are divided into different parts- based on what they do! The rear delts also assist in scapular retraction or pulling your shoulders back.
This outline only serves as a basic overview- but essentially, the functions that the upper back muscles carry out during a back squat are to help stabilize your upper body, perform scapular retraction & depression, and adduct the arms- keeping them close to your midline. Understanding these processes can help you apply them.
2. Why is upper back tension important?

As somewhat touched on before, the squat is a full-body lift. No, it’s not just quads or glutes, every single muscle is involved. You cannot squat 300 lbs without recruiting your back and core to support you.
Think of your body as a link of chains- they all work together to produce a rep. If one link slips, the entire chain falls, and you fail an attempt.
At a max effort attempt, efficiency is of utmost importance. A slight change in positioning can make or break the entire movement because it can throw off the whole rep. To maximally exert force, everything must be damn near perfectly aligned. Additionally, proper positioning in one area can support better technique in another. For example, if your bar is in the right spot, it’ll be easier to create upper back tension, which can improve hip & knee positioning. Approach your squat with this mindset: every component impacts another, so you want to make sure you’re executing with as much intent as humanly possible.
I’ve seen it time and time again, in both myself and my athletes- lifters lose their upper back, round forward out of the hole, their hips shoot up, they lose their brace, and they just can’t stand up with it.
Essentially, your upper back is a key technical aspect of a strong squat and can either hold you back or move you forward. If upper back tension is your weakness, you’ll want to attack it to continue producing PRs- or else- stagnation will be your destiny. Focus on your cues, your positioning, and your programming to help you improve it.
3. How can you tell if you’re engaging your upper back?

Even with the best cueing, it can be difficult to visualize- or even notice- whether your upper back is stable in a back squat. Here’s what we want to focus on:
Scapular retraction: (squeezing the shoulder blades together). This motion recruits your rhomboids, traps, and lats- aka the big muscles in your upper back. Doing so helps you provide a stable base for the bar to rest on, maintain tension throughout your upper body, and activate these muscle groups to support your lower half.
Scapular Depression: This one is less common of a struggle but still worth noting. To “depress” the scapula, you want to pull your shoulder blades down, away from your ears, and maintain this. Doing so will help you hold your brace and further engage your lats.
Static contraction: Your arms/shoulders aren’t moving during the squat, so the goal is to maintain that retracted position during the entire rep. Your back should stay really tight throughout the whole descent and ascent.
Common faults:
When you know what to look for, it’s relatively easy to differentiate between a tight and loose upper back in the squat. These are some common mistakes:
Elbows falling forward: If your elbows come forward, underneath the bar, you’re losing your retracted position- as the elbows have to be slightly behind the bar to maintain it.
Elbows flailing backward: If the elbows start swinging back, “chicken-wing” style, you’ll also lose tension- and may be more likely to round/have your hips shoot up.
Rounding throughout the upper back: Easy to spot- any rounding in the upper body will likely lead to a compromised position elsewhere.
What DO you want to see:
Instead, the elbows should be slightly behind the bar at all times. This is because, in a low-bar back squat, if the elbows are directly underneath the bar, it will likely slide down the back, and you won’t be able to keep your lats set. The upper back should stay static: you want to see as minimal movement as possible during the entire rep- this implies that the lifter is maintaining tension. The upper back should remain relatively neutral, avoiding excessive arching or rounding.
Now that you have an idea of why upper back tension is important & what it entails-
4. TIPS TO IMPROVE UPPER BACK TENSION:

A) Bar position

One of the three main technical factors in creating upper body tension is where the bar rests on your back. A common mistake I’ve seen, especially with the popularity of it shared on Instagram, is setting the bar too low on the back. You’d think since it’s called “low bar,” this seemingly shouldn’t matter- right? Actually, having the bar too low is not only dangerous- but also- inefficient. For one, it’s more likely to slide off of you & become a hazard. Additionally, the bar is usually too far down to feel that “wedge” on your back, getting as tight as possible, and may promote a more “Good-morning” style squat.
Instead, set the bar right on top of the posterior delts. The difference in position between High bar and Low bar shouldn’t be significant, just a slight couple of inches. That way, you can maintain better positioning & create more stability.
B) Grip width-

While there is no strict rule for where to grip the bar, general guidelines apply. Of course, everyone’s mobility and anatomy will differ, impacting where your most comfortable grip is- especially with Low bar since more mobility is required (your arms are further behind your body).
There’s this false idea that the closer you can get your arms together, the better, the “tighter” you’ll be. While this position may feel tight and secure, it may make it harder to maintain upper back tension. Why? There’s less room for you to actively retract; when your arms are shoved into your sides. It’ll likely be harder to control your arm position, which can be more conducive to that elbow flare/”chicken wing” fault mentioned above. On the contrary, gripping the bar far too wide will also make it harder to “access” and “feel” your upper back tension. Most lifters do best somewhere in the middle, and starting with your pinkies lined up on the knurlings is generally a great place to begin. Experiment with wider/closer grips to see what feels best. Optimizing your grip width can help you maximize efficiency through your upper back, impacting the rest of your squat.
C) Grip types-

Even past where you set your hands on the bar, there’s a degree of difference between how you place your hands.
The most common way to grip the bar when squatting is by wrapping your thumb over your fingers. This grip often feels most natural and secure and works well for many.
However, if you think you might benefit from a change, there are two other options:
-Thumbless, and,
-Talon grips.
A thumbless or “suicide” grip is what it sounds like- instead of wrapping your thumb over your fingers, it freely hangs over the bar- next to your pointer finger. Some lifters are wary of this, however, it’s far less dangerous to hold the bar this way when back squatting than when bench pressing, as the bar is secured by your shoulders & palms. This grip may be helpful for those with limited shoulder mobility, which can also improve your upper back position by getting the bar in the right spot.
A talon grip is far less common than the other two but is still an option for some. With the talon grip, your pinky is draped underneath the barbell rather than placing it over top. What’s the purpose? This grip can help reduce elbow strain, which can be reason alone to use it for those who experience discomfort. Additionally, some may find that it naturally cues lat tension. It can be quite uncomfortable, and is not inherently better, but especially for those squatting >400 lbs, Talon may be worth a shot.
Every detail can impact your squat positioning- and even the seemingly most minute changes can drastically improve your lift. Ensure that each aspect of your setup is intentional, supporting you, and experiment with different styles if something isn’t working. That’s what this journey is all about- trial and error to find what breeds the strongest “you” possible.
D) Cues to help

Sometimes, creating a stronger upper back position comes down to knowing what to focus on. Here are some of my favorite cues to do that:
”Squeeze your elbows together” - imagine pinning your elbows next to each other, trying to get them as close as possible, and holding that during the rep.
”Chest up” and “Push the bar to the ceiling” - these cues work especially well for those who tend to fall forward.
”Squeeze a penny between your shoulder blades” - this cue may click more for some lifters: imagine holding a penny in your scapula & you don’t want to let it fall out!
”Elbows behind the bar,” “elbows under the bar,” - depending on which fault you tend to fall into! Over-cue in the opposite direction to find your perfect medium.
”Pull your shoulders down, away from your ears” - helps cue scapular depression- if that’s something you struggle with.
Whichever cue resonates with you, choose 1-2 to focus on every time you squat, and visualize that sensation during the rep. Your mental connection to your body & intention of movement drastically influences your overall performance.
4. Movements to help improve it-

Beyond cueing & setup, building your program around your weaknesses can help you better develop & improve them. Exercise selection plays a significant role in determining the training effect you receive. Here are some of my favorite squat variations for targeting the upper back:
A) Cambered Bar-

This bar was originally designed for those with mobility restrictions in mind, and has an element of instability. For the upper back specifically, it allows you to have your arms on the sides of your body, which can help further cue that retraction & lat tension. Additionally, the Cambered bar will force you into a more upright position, making it more difficult to round forward- all in all, improving your upper back tension. I like using this variation for moderate sets and reps, and you can also add a pause or a tempo for further challenge.
B) Pause/Tempo Low Bar Squats

Simply changing the tempo of your typical squat can help you better cue upper back recruitment. With greater time under tension, you have more time to focus on your movement and have to stay tighter for longer. Adding a pause at the bottom/around your sticking point, or slowing down the eccentric portion, can help you do that. This variation can be conducive to nearly any training phase because it’s pretty specific to your Competition-style squat- while providing variety.
C) SSB Squats

The safety bar squat is also a great way to mitigate shoulder/elbow discomfort and recruit the quads. This bar can help cue you to stay upright & keep your elbows close to your body because the handles put your arms in front of you- rather than behind. Therefore, this variation can help hammer your positioning out of the hole and recruit your upper back. I like SSB squats in an off-season or volume block, but they can also be used to build strength in lower rep ranges.
D) High Bar Squats

Incorporating some High Bar as a variation can also help strengthen your upper back! Placing the bar a bit higher on your back changes the mechanics of the movement, requiring you to stay more upright and maintain this position out of the hole. The main reason that lifters can squat more weight low bar vs. high bar is that, during Low bar, the upper back is less recruited to maintain positioning. So, if your goal is to challenge your upper back, incorporate some High bar to optimize your position. Include this variation in an off-season, volume block, or even closer to a meet- with a multitude of rep ranges.
E) Front Squats

I love a Front squat for many reasons, one being the demand on the upper back. It’s difficult to fuck up a Front squat, as you’re required to remain upright out of the hole. Keeping your elbows up in that Front-rack demands a lot of upper back & core, which can carry over to better positioning in your low bar. These work great in any phase for a variety of rep ranges.
-
Upper back tension. It’s one of the most underutilized aspects of a strong back squat. While many lifters consider this movement a “leg” exercise, the truth is that every muscle group works together to move that weight. Your rhomboids, traps, and lats are required to create proper stability and positioning, which impacts your lower half, too. Simply thinking more about your upper back, with proper cueing & focus, can help you improve your performance. Other factors, such as grip width, bar position, etc., will also impact your execution. Making even the smallest changes can drastically change the way you squat- for the better. And, if you find your upper back is a perpetual weakness, incorporating variations that target that region in your programming- can help you increase the number on the bar. If a strong, impressive squat is what you chase, focus on optimizing every aspect of it- and a major component is your upper body. Neglecting it is how you stay stagnant.